For co-hosts and editors
Running an event album
- 1Create the eventName and web address
- 2Find your wayThe Manage tabs
- 3Make the pageLook, wording, directions
- 4Add peopleCo-hosts, editors, viewers
- 5QR cards & postersTables and the door
- 6Photos come inYou approve them
- 7Albums & slideshowCeremony, Reception…
- 8PublishChoose who sees it
Plus: put i2w2i on your phone and get notified when photos arrive.
Step 1
Create the event
New event
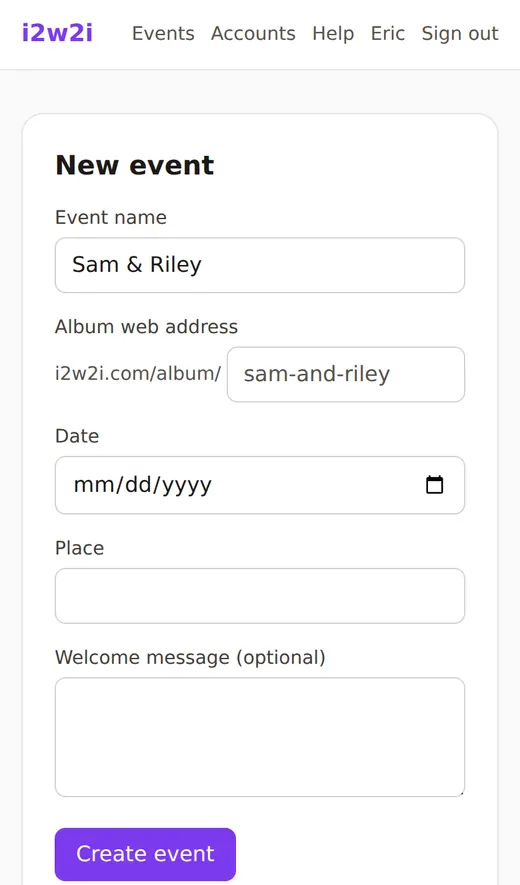
Sign in at i2w2i.com. On your home page, tap + New event (or Plan your own event, beside any events you’ve been added to).
- Event name: write two names with an “&” (“Sam & Riley”) and the fancier looks set the “&” in script.
- Album web address fills itself in. It’s the link people will use, so keep it short.
- Date, place and a welcome message are optional. You can change everything later.
Tap Create event. It starts as a private draft.
Step 2
Find your way around Manage
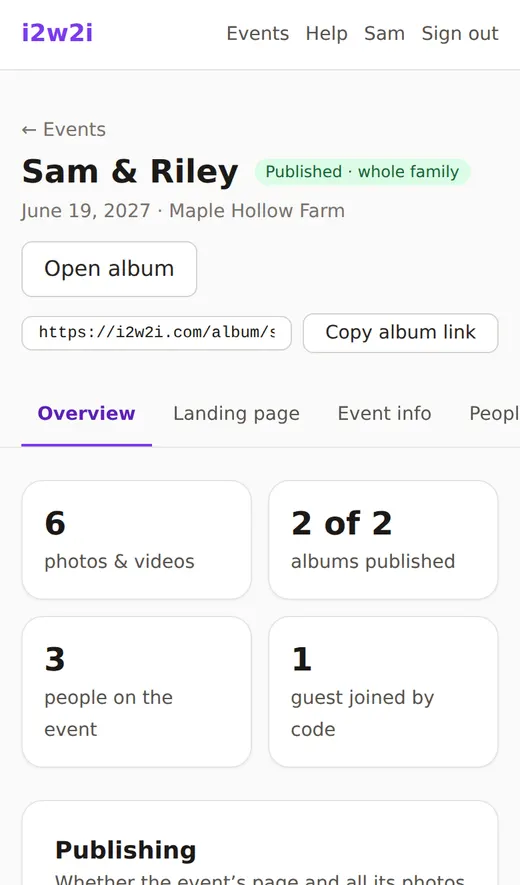
The event opens on its Manage page. Each job has its own tab, so nothing is buried at the bottom of a long page.
The tabs
At the top: the event’s name, Open album (the page guests see) and Copy album link. Under them, the tabs. On a phone, swipe the row sideways for the rest.
- Overview: what’s waiting, how far along you are, a checklist of what’s left, Publishing and notifications.
- Landing page and Event info: what guests see (step 3).
- People: co-hosts, editors and viewers, and the guests who joined with a code (step 4).
- Photos: a number shows how many wait for your OK (step 6).
- Albums: named albums like “Ceremony” (step 7).
- QR & posters: guest codes, table cards and door posters (step 5). Co-hosts only.
- Activity: who did what, and when.
Step 3
Make the page yours
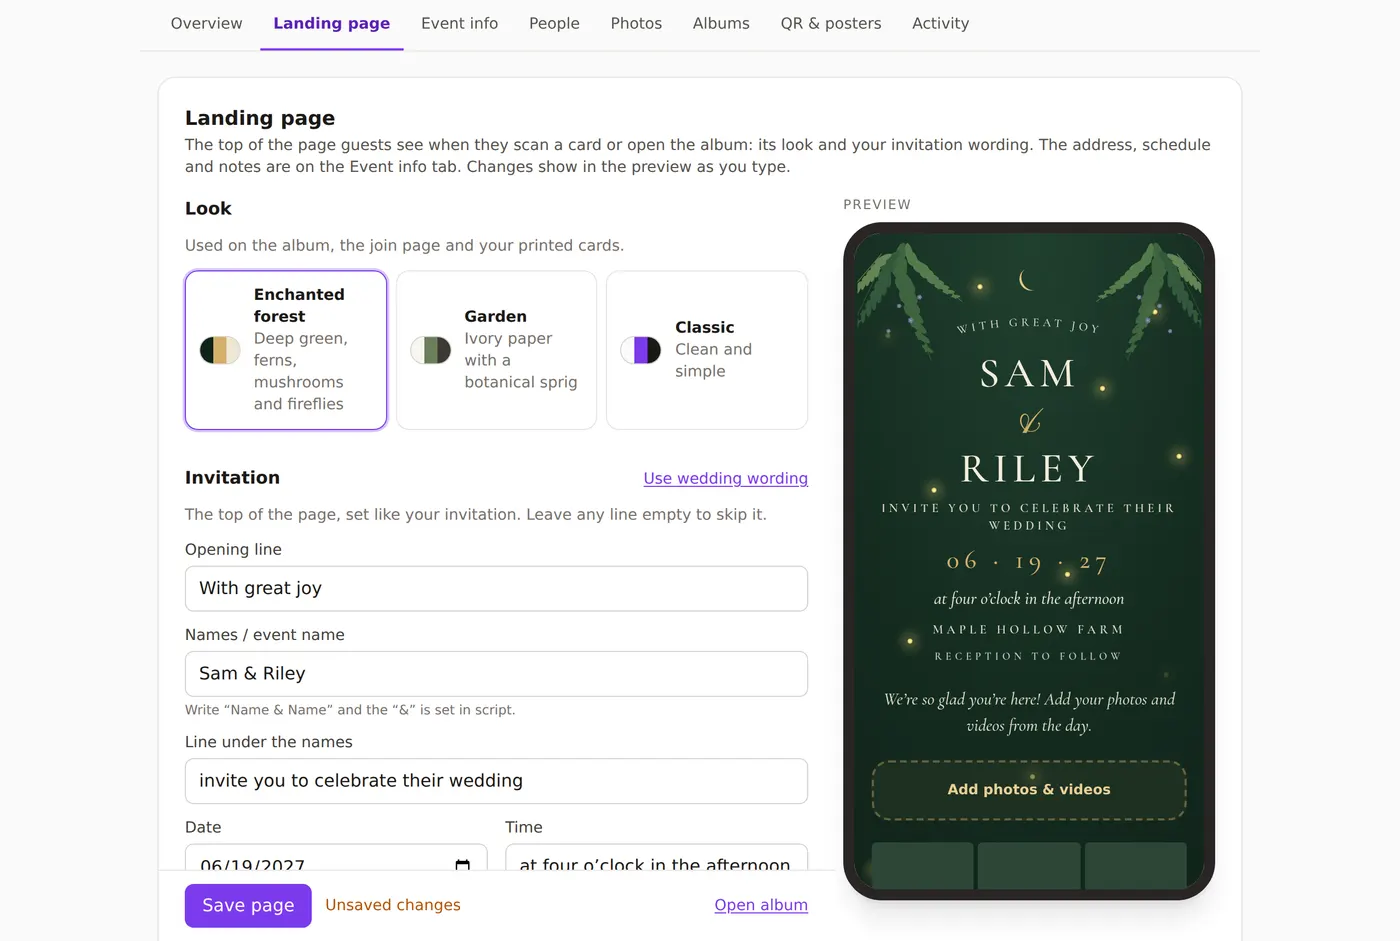
Two tabs hold everything guests see, each with a live phone preview beside it.
Landing page
- Look: Enchanted forest, Garden or Classic. It’s used on the album, the page guests land on and the printed cards and posters.
- Invitation: tap Use wedding wording for a start, or write your own lines. Empty lines are skipped.
- Welcome: a few words under the invitation.
Tap Save page. Guests see it right away. If you forget, it says Unsaved changes.
Event info
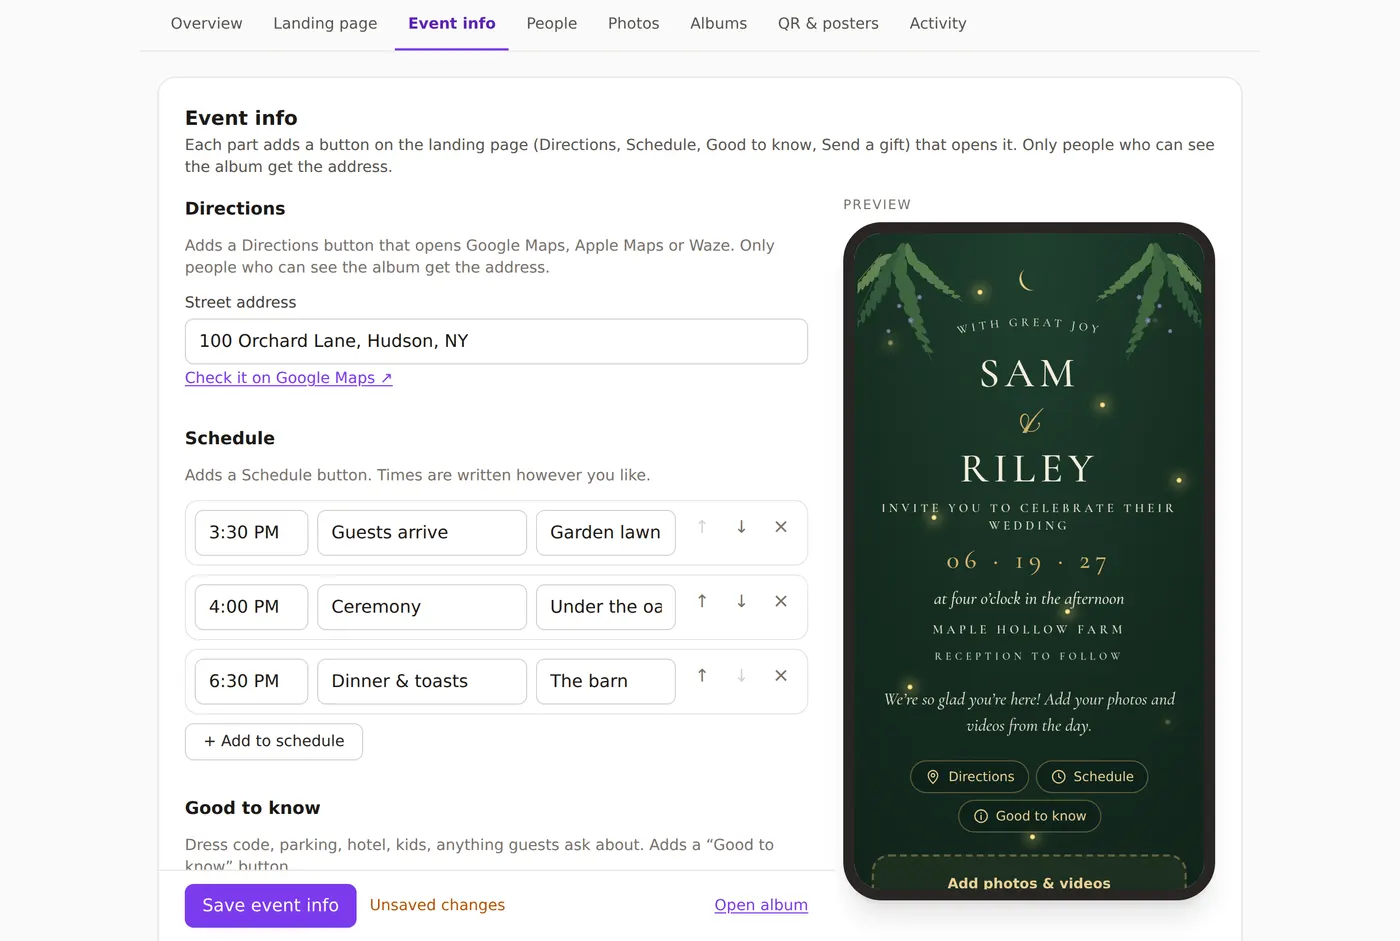
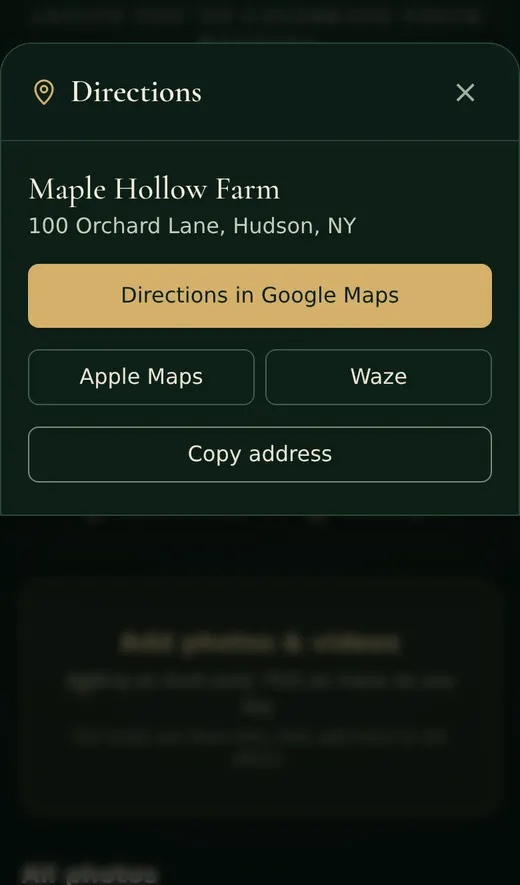
- Directions: a street address adds a Directions button (Google Maps, Apple Maps, Waze).
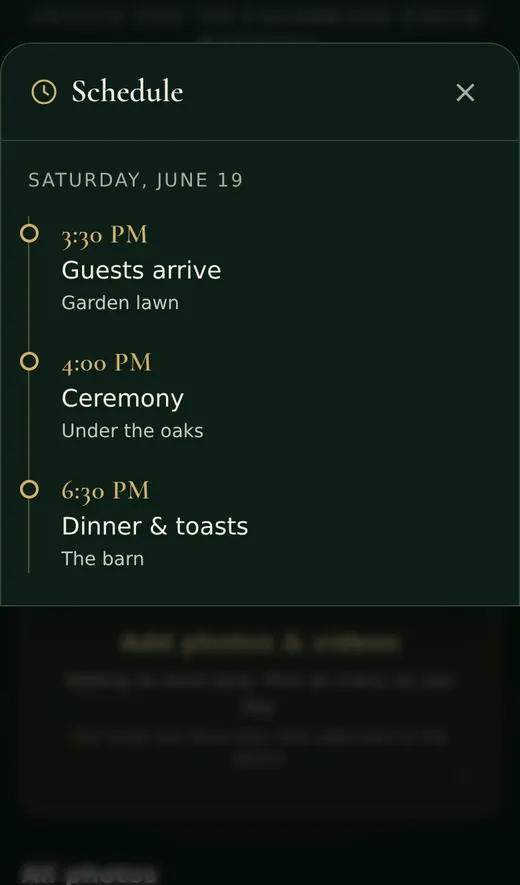
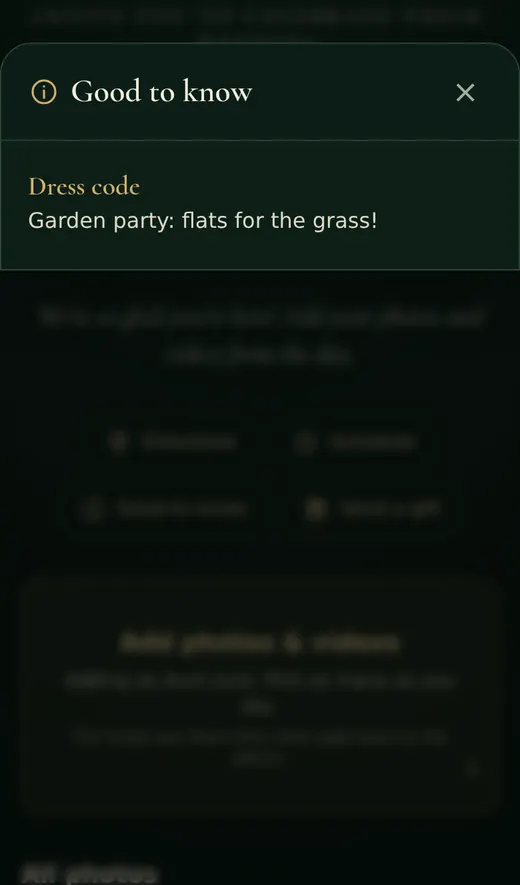
- Schedule and Good to know (dress code, parking, hotel) add their own buttons.
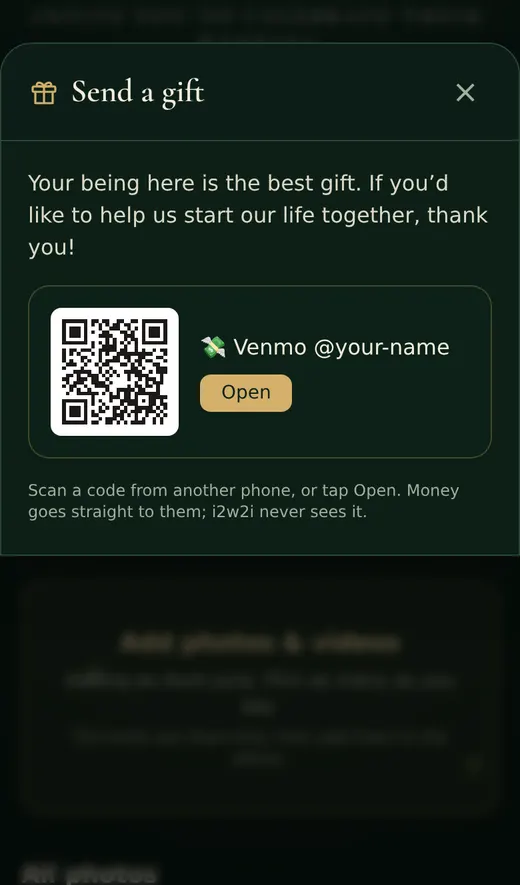
- Gifts: a short note shown above your Venmo or registry links, which co-hosts add under Gifts & payments further down the same tab.
Tap Save event info. Only people who can see the album get the address.
What guests get
The buttons under the invitation open a small card. Money from Send a gift goes straight to you through Venmo, PayPal or Cash App; i2w2i never touches it.
Step 4
Add people
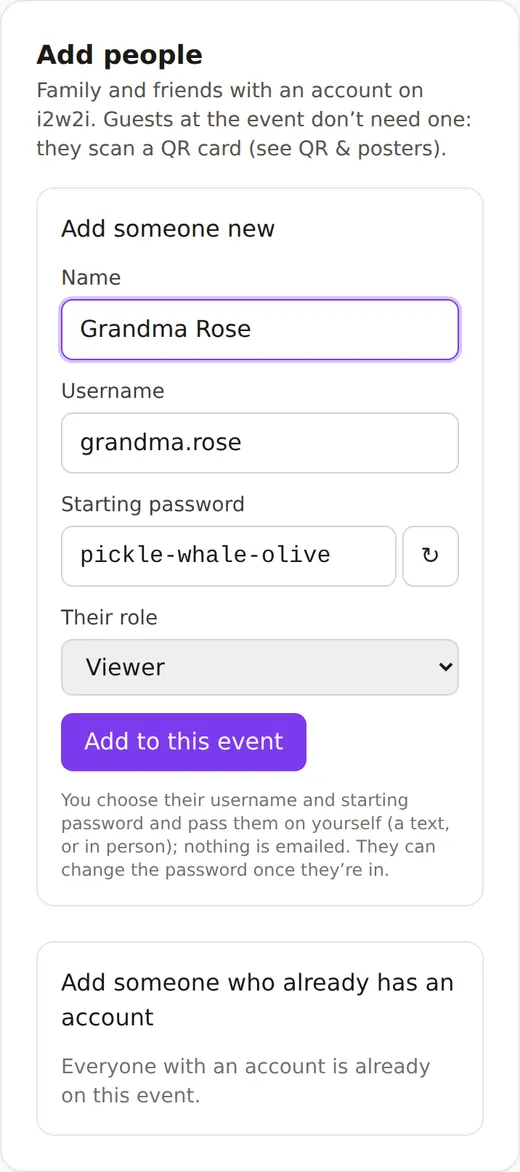
For anyone who should have their own sign-in: co-hosts, the wedding party, family. You give each one a username and password; there’s no email. Only co-hosts add people and change roles.
Add someone new
On the People tab, under Add people, type their name. A username and a starting password are filled in for you; change either if you like. Pick a role and tap Add to this event:
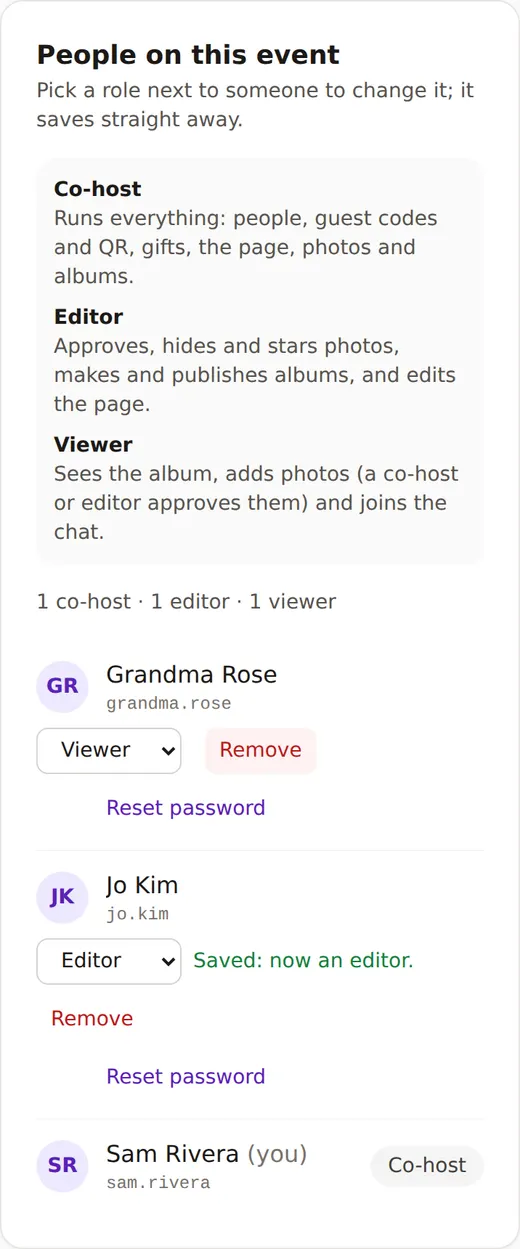
- Co-host: runs everything for this event, like you: people, guest codes and QR, gifts, the page, photos and albums.
- Editor: approves, hides and stars photos, makes and publishes albums, and edits the page.
- Viewer: sees the album, adds photos (a co-host or editor approves them) and joins the group chat.
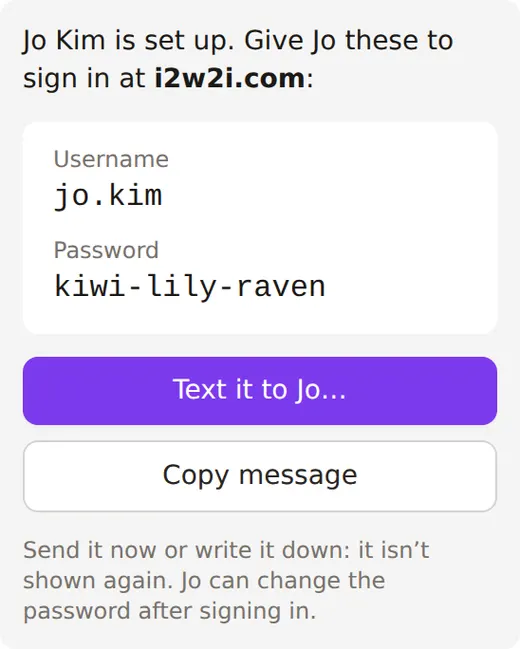
You get a box with their username and password. On a phone, tap Text it to…; on a laptop, Copy message and paste it into a text, or just read it out. The message has the link to sign in; they land in the album.
Someone who already has an account? Pick them under Add someone who already has an account, choose their role and tap Add.
Change someone’s role
Under People on this event, pick a new role next to their name. It saves straight away and says Saved; there’s no button to press. Remove takes them off the event.
An event always keeps at least one co-host, so the last one can’t be changed or removed.
Step 5
QR cards for the tables, a poster for the door
For guests without an account: they scan, type their name and they’re in. All of it is on the QR & posters tab.
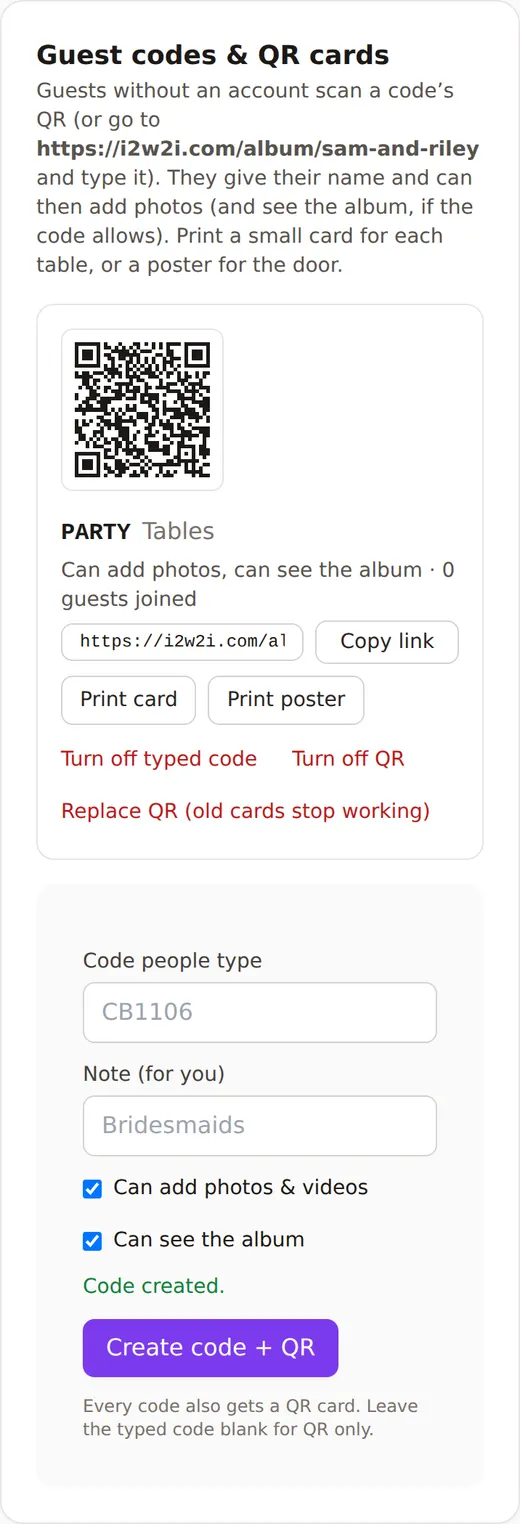
Guest codes & QR cards
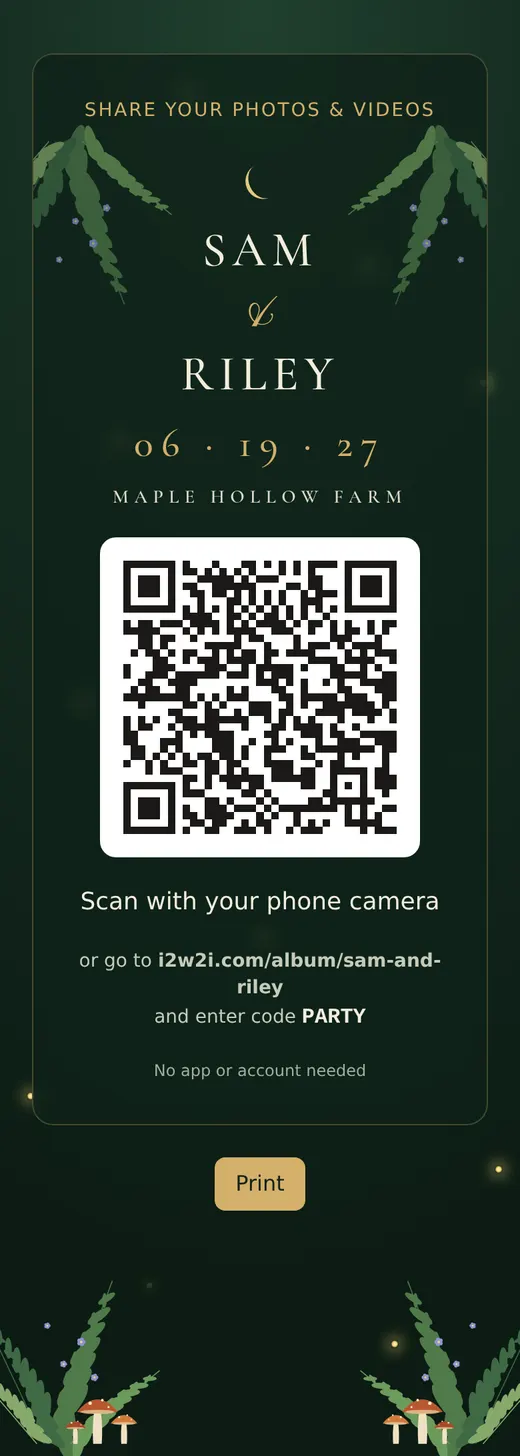
Under Guest codes & QR cards, type a short code (like PARTY) and a note for yourself. Leave both boxes ticked. Tap Create code + QR.
Then tap Print card and Print. The card is in the event’s look, with the QR on white so every phone can read it. Anyone whose camera won’t scan can type the address and the code instead.
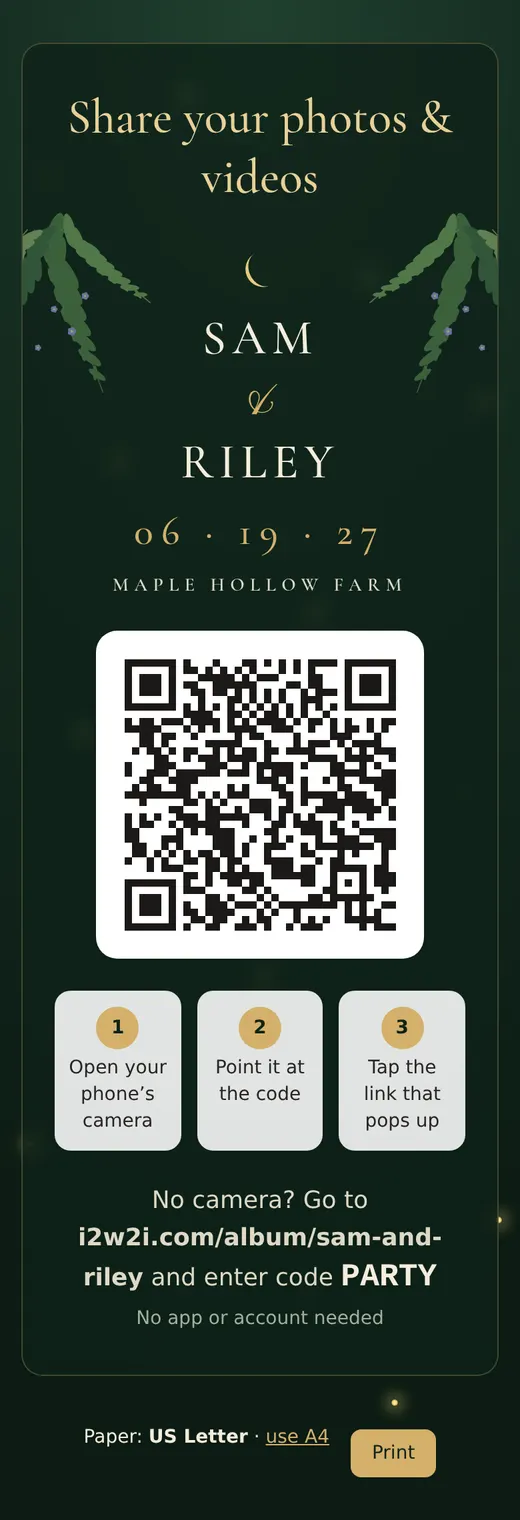
A poster for the door
Tap Print poster next to the code for a full page to put on an easel, by the bar or at the guest book: the event in its look, a big QR, three steps and the typed code for anyone without a camera.
It’s set for US Letter; tap use A4 for A4 paper. It always fits on one sheet.
Further down, The album’s own link has an Album card and Album poster for the album itself, once it’s published to the family or to everyone.
Step 6
Photos come in, and you approve them
Nobody sees anyone else’s photo until a co-host or editor has looked at it. That’s enforced by the database itself, not just the screens.
Adding photos
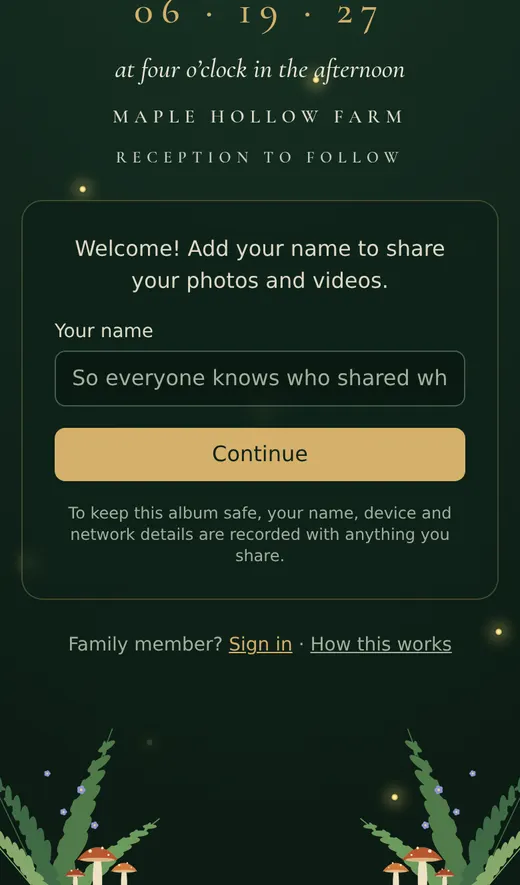
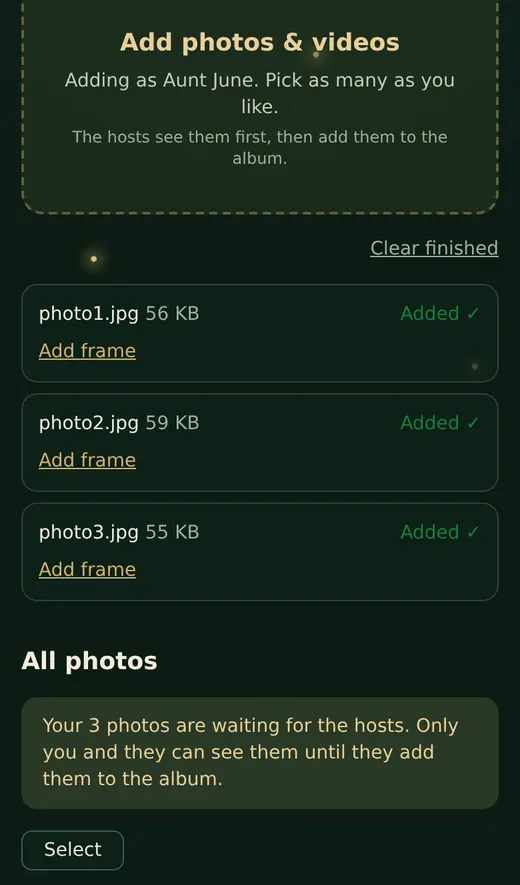
On the album, tap Add photos & videos and pick as many as you like. It’s the same for you, invited people and table guests. Uploads keep going if someone switches apps or loses signal.
Guests see their own photos straight away, marked Waiting, with a note that only they and the hosts can see them for now. Photos that co-hosts and editors add go in without review.
Approving, and posting to albums
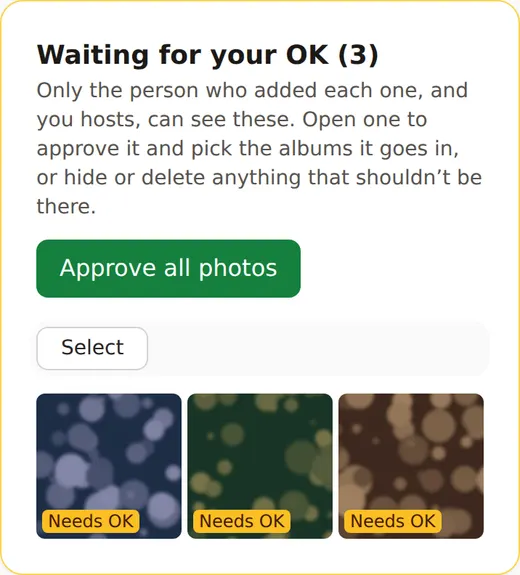
When something is waiting, your event card says “3 waiting for your OK”, the Overview shows a yellow banner and the Photos tab shows a number. On the Photos tab, under Waiting for your OK, either:
- Approve all photos after a look at the grid, or
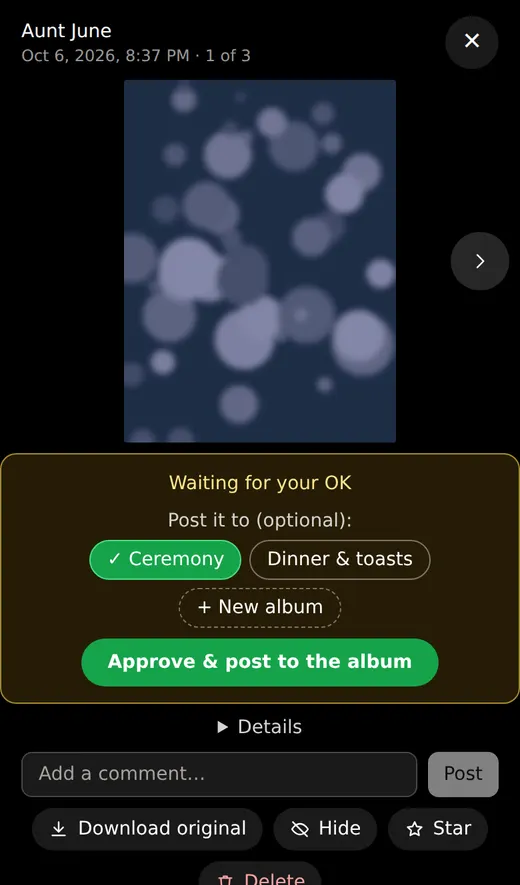
- tap a photo. Under Post it to, tap the albums it belongs in (+ New album makes one on the spot), then Approve & post to the album. With no album picked it’s just Approve ✓. The next one comes up by itself. Hide and Delete are underneath.
Clicking through the album itself works the same: as a co-host or editor, a waiting photo shows the same panel there.
Afterwards: tidy and keep
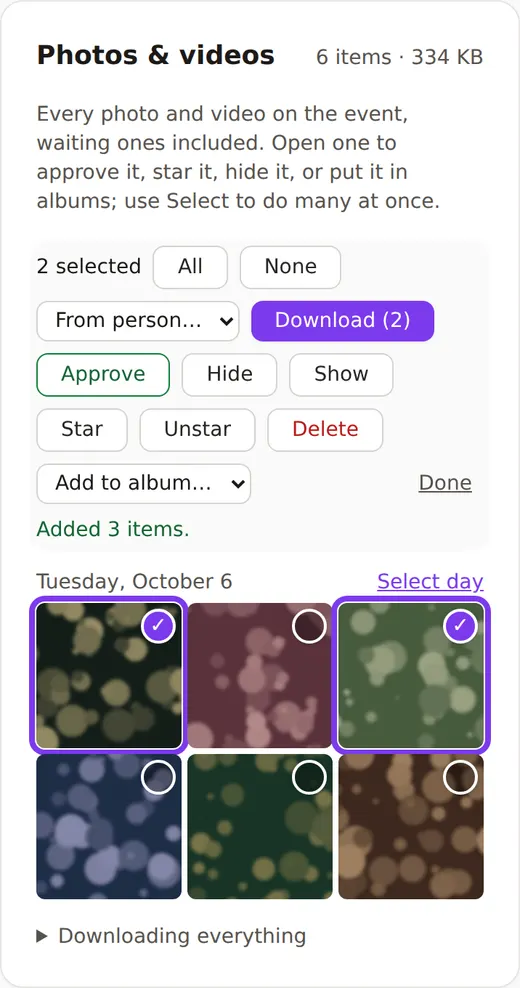
On the Photos tab, under Photos & videos, tap Select, then tap photos, or All, or Select day, or pick everything from one person. Then:
- Download saves a zip of the full-quality originals.
- Add to album… files them into an album.
- Star puts favourites first.
- Hide takes a photo out of the album and every named album; Show puts it back.
Each table guest is listed on the People tab under Guests with their name and phone, and Remove if someone shouldn’t be there.
Step 7
Albums: Ceremony, Reception, the dance floor…
Every approved photo is in the event’s main album. Named albums are your picks from it, for guests to browse one part of the day at a time.
Make and fill albums
On the Albums tab, give it a name and, if you like, a line about it. Tap Make album. It starts as a Draft: only co-hosts and editors see it.
Put photos in it any of these ways:
- while approving, with Approve & post to the album (+ New album there makes one on the spot: type its name and tap Make);
- on any approved photo, tap the album’s name under In albums (a ✓ means it’s in);
- Edit & add photos, then Select, pick them and tap Add to “Ceremony”.
On the album’s own page, open a photo for Use as album cover or Take out of this album. Taking a photo out of an album leaves it in the event.
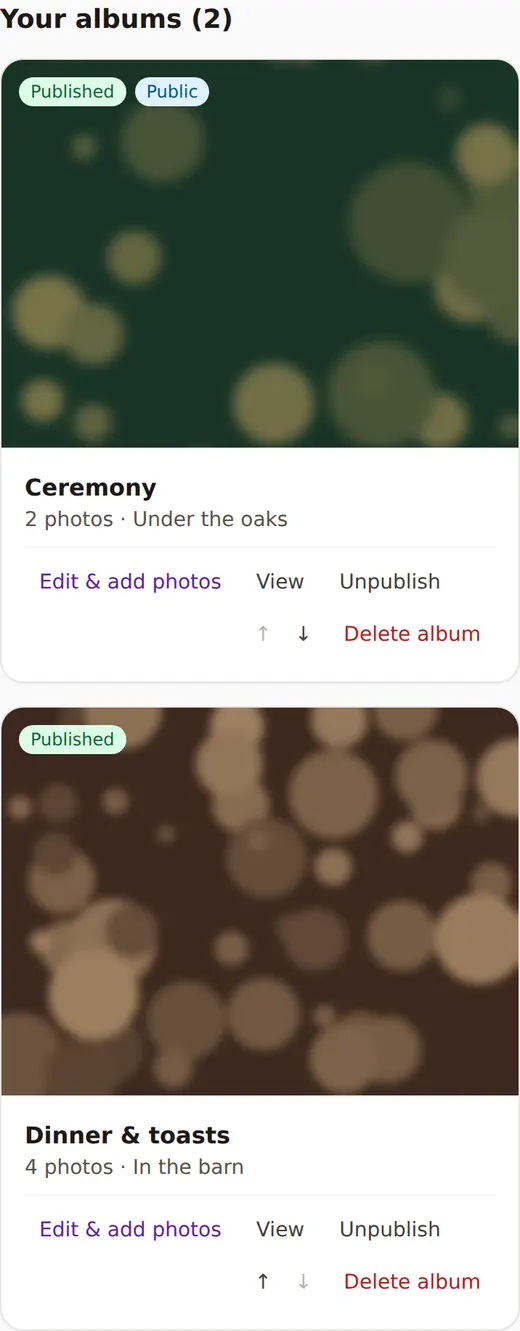
Use ↑ and ↓ to set the order guests see. Delete album removes the album but never its photos. Renaming keeps its link, so shared links still work.
Publish it: private or public
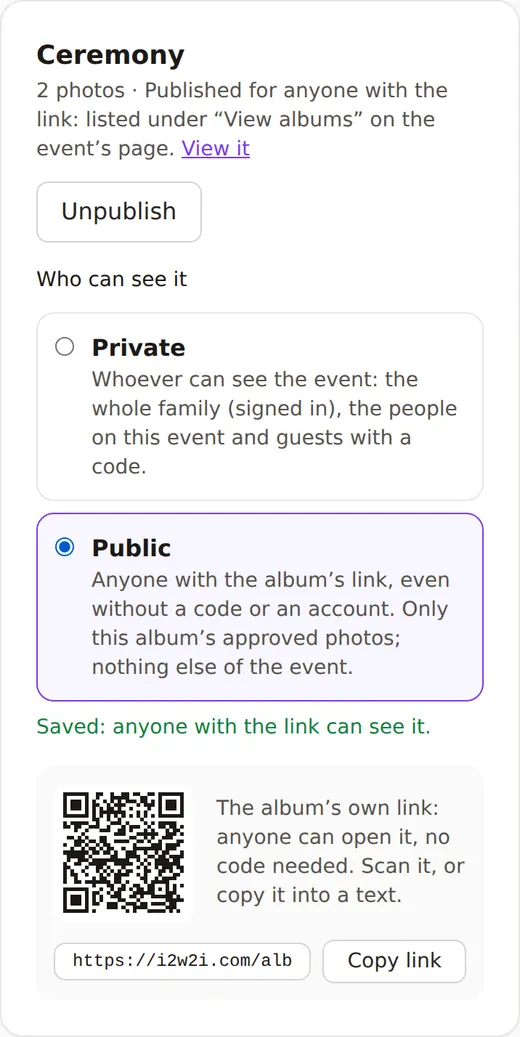
When it’s ready, tap Publish album, then choose Who can see it. It saves as soon as you pick:
- Private: whoever can see the event (its people, guests with a code, and the family or everyone if you published the event to them).
- Public: anyone with the album’s link, even without a code or an account, while the rest of the event stays private. They see only that album’s approved photos, and its slideshow; no other photos, no address, no chat.
A published album shows its own link with a QR code to copy or scan. Unpublish takes it down again, and making it private again closes the link straight away.
What guests see
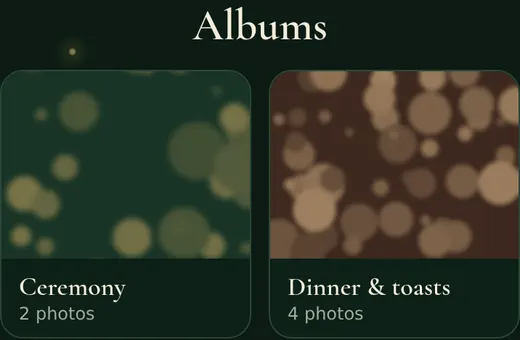
Once an album is published and has a photo in it, the event page gets a View albums button and an Albums section with a card for each. Each card opens the album’s own page with just its photos. Everything approved is still under All photos.
Public albums are also listed under Albums anyone can see on the event’s page for visitors who haven’t joined, below the box for the code.
An album never shows anyone a photo that’s waiting or hidden.
Slideshow, on a TV or a laptop
Every album has a Slideshow button: on an album’s own page, and next to All photos. Pick how it plays, then tap Start slideshow:
- Change every 3, 5 or 10 seconds;
- In order or Shuffle;
- Fade from one photo to the next, or No fade;
- Border: none, thin or wide (white, like a print).
The photos fill the screen and the screen stays on. Photos approved while it plays join in by themselves, so a laptop plugged into a TV can run it all evening. Tap the screen or press Esc to go back to the album. The device remembers your choices for next time.

Step 8
Publish: choose who sees it
Approved photos are always visible to people on the event, and to table guests whose code has “Can see the album” ticked. Publishing opens it wider.
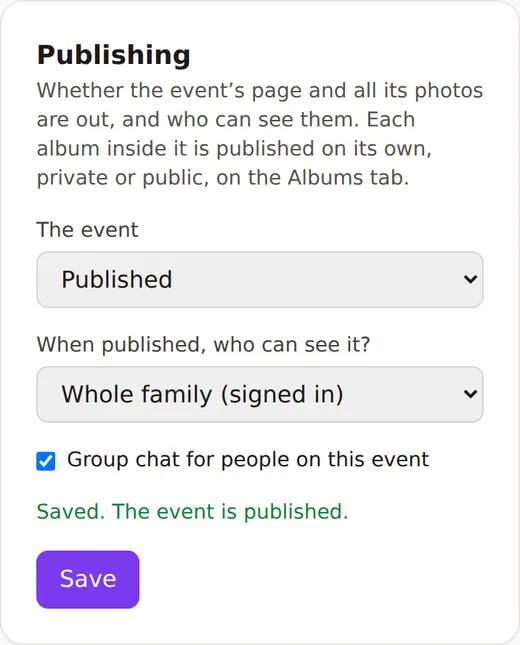
Publishing
On the Overview tab, under Publishing, set The event to Published, choose who, and tap Save:
- People on the event & guest code holders: just the people above.
- Whole family: every family account, signed in. It shows on their home page under Family albums.
- Anyone with the link: a public page. Still only approved photos, and visitors can’t add anything or download originals.
Change your mind any time; it takes effect immediately. Publishing the event decides who can open it; each named album is published on its own, on the Albums tab.
On your phone
An i2w2i icon, and a buzz when photos arrive
i2w2i works in any browser, but on a phone it’s nicer as an app: one tap opens your albums, and hosts can be told when guests’ photos are waiting.
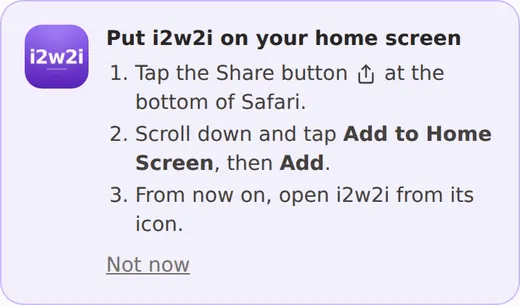
Put it on your home screen
Signed-in people see a Put i2w2i on your home screen card on their home page and in their albums.
- iPhone: tap the Share button (the square with an arrow) in Safari, then Add to Home Screen.
- Android: tap Add to home screen on the card.
The icon opens full screen to their own page: the events they’re on, family albums, and any other family apps they’ve been given. If it asks them to sign in the first time, they do it once and stay signed in. Guests at the tables don’t need any of this; they just scan.
Get notified when photos wait for you
Co-hosts and editors: on the event’s Overview tab (or your account page), tap Turn on notifications and allow them. Do it once on each phone.
When guests add photos you’ll get one notification like “Sam & Riley: 12 new photos are waiting for your OK”, at most every couple of minutes. Tapping it opens the Photos tab, ready to approve. Send a test checks it works.
At a glance
Who can do what
| Person | Add photos | See photos | Approve, hide, albums | Page & publishing | People & QR codes |
|---|---|---|---|---|---|
| Admin (Eric) | Yes | Everything | Yes | Yes | Yes, any event |
| Co-host | Yes, no review | Everything | Yes | Yes | Yes |
| Editor | Yes, no review | Everything | Yes | Yes | No |
| Viewer (invited) | Yes, reviewed | Own + approved | No | No | No |
| Table guest (code) | Yes, reviewed | Own + approved* | No | No | No |
| Family, not on the event | No | Approved, if published to the family | No | No | No |
| Anyone with the link | No | Approved, if published to everyone | No | No | No |
| Anyone with a public album’s link | No | That album’s approved photos | No | No | No |
* If the code’s “Can see the album” box is unticked, table guests only ever see their own photos.